
Guest blog by Tahni Jungst, MS student, University of Colorado Boulder
May 3, 2021
For my Air Pollution Control class in the Spring of 2021 I was tasked with conducting a research project on an air quality topic of my choice. But when Dr. Miller suggested the idea of testing a Do-It-Yourself (DIY) air cleaner I jumped at the chance of trying a home experiment. Especially since this opportunity could benefit my own knowledge of indoor air quality (IAQ) and better understand the choices I can make to improve my home environment.
The idea for DIY air cleaners has been around for many years, but with the coronavirus pandemic impacting our lives there is an emphasis on cleaning indoor air to limit the spread of the virus. Indoor air cleaners have been used to limit exposure to high pollution levels in cities or during wildfire season. Specifically in my research I found that the efficiency of indoor air cleaners has been tested for limiting exposure to particulate matter (PM) from wildfires (research article from the University of Washington, Seattle). Whatever the reason may be for wanting to improve IAQ there are options available that won’t break the bank.
I first saw a few videos on how to construct a DIY air cleaner at home, such as a video by This Old House on Youtube. I was also directed to a Wired article, where Dr. Richard Corsi, an air quality expert and the dean of Maseeh College of Engineering and Computer Science at Portland State University, was interviewed about the effectiveness and proper construction of a DIY air cleaner. During the reporting for this article the author also collaborated with a filter manufacturer, Tex-Air, to test out different variations for a DIY air cleaner. Tex-Air also posted their findings on their website, Tex-Air article. Each of these designs have variations in how they are constructed, but typically use a box fan, such as the 20-inch 3-speed box fan from Lasko, which can be found at Home Depot for $18.97, and 20” x 20” MERV 13 filters, commonly used in heating, ventilation, and air conditioning (HVAC) systems. The MERV 13 filters can be found for around $11 per filter (6-pack at Home Depot).
Minimum efficiency rating values (MERV) is a rating system developed by the American Society of Heating, Refrigerating, and Air Conditioning Engineers (ASHRAE) for filters used in HVAC systems. These filters come in many sizes and MERV ratings, but for a DIY air cleaner it is best to use 20-inch by 20-inch filters so that they are compatible with a 20-inch box fan. ASHRAE recommends using a MERV 13 filter or higher for HVAC systems, likely because a MERV 13 filter is a good mid-point between high filtering capacity without putting too much strain on a typical motor. A MERV rating of 13 indicates that the filter is 50% efficient at filtering 0.3 -1.0 μm particles, 85% efficient at filtering 1 - 3 μm particles, and 90% efficient at filtering 3 - 10 μm particles. The filters also vary in thickness. The thicker the filter the more surface area and less resistance there is on a fan motor blowing or pulling air through the filter. Common thicknesses are 1-inch, 2-inch, and 4-inch.
For the construction of my DIY air cleaner I was provided with 2-inch thick, 20-inch by 20-inch filters. I constructed an open box using four of these filters taped together with clear packing tape. There are arrows on the sides of the filters indicating the direction of airflow, which is important for constructing the air cleaner to work properly. I taped the box fan to the top of the four filters so that when the fan is turned on it will pull air through the filters and up through the fan. See the images below (Figure 1) for how I constructed my air cleaner. I used some thread with a piece of colored tape on the end to test the air flow around the filters and at the seams where each piece was taped together to look for leaks in the system.
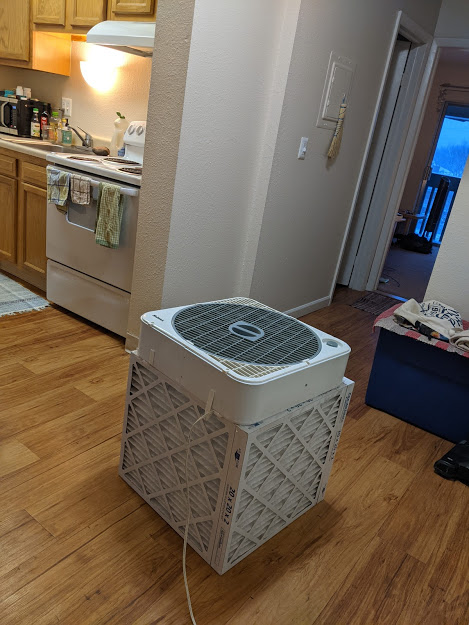

Figure 1: Photos of constructed DIY air cleaner and testing air flow around filters and seams.
To test the DIY air filter I decided to cook the same meal four times and run the fan on high for two of the tests. The meal I chose was sweet and sour chicken with rice noodles (Figure 2), which consists of boiling water for the noodles and cooking cubed chicken breast with spices, along with peppers, pineapple and a simple sauce. I used a cast iron skillet with approximately one tablespoon of vegetable oil on my electric stove top to cook the chicken. The cooking events lasted for 30-60 minutes, meaning that my stove was on during those times and I was actively cooking. I kept notes on when I turned the stove on or off, when the DIY air cleaner was turned off or on, and at what speed the fan was operating (high or low). During times I was not cooking I would turn the fan to low speed.
Figure 3 shows my apartment layout with the DIY air cleaner labelled, as well as the sensor. The sensor and DIY air cleaner were both approximately five feet away from the stove. My apartment is a single bedroom apartment and about 520 square feet.

Figure 2: Photo of sweet and sour chicken with rice noodles.

Figure 3: Apartment layout and experiment set up.
During my in-home experiment I was using an Airthinx IAQ sensor to measure multiple air quality parameters (Figure 4). I mainly focused on particulate matter (PM2.5) data, but the sensor also measures carbon dioxide concentrations, temperature, pressure, humidity, formaldehyde concentrations, PM1, PM10, and two types of volatile organic compounds (VOCs). The Airthinx sensor takes readings every minute.
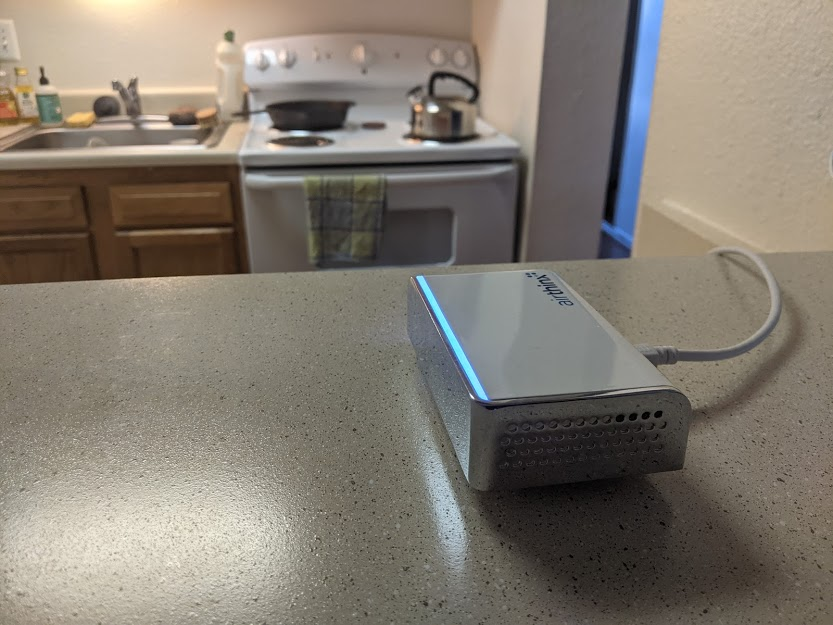
Figure 4: Photo of Airthinx sensor placed on countertop approximately 5 feet from stove.
PM2.5 is fine particulate matter that is 2.5 micrometers or smaller, approximately 20 times smaller than the width of a human hair. PM2.5 is known to be hazardous to human health because these particles are inhalable, can penetrate deep into the lungs, and cause stress on the lungs and heart (see US EPA website for more information on PM). PM2.5 emissions are commonly the products of combustion. The largest source of PM2.5 in the U.S. being transportation and the burning of fossil fuels for energy generation.
The four cooking tests resulted in the following peaks of each size of particulate matter (Table 1). Tests 1 and 2 are the cooking events without running the DIY air cleaner, and tests 3 and 4 were completed with the DIY air cleaner on high speed. The difference in peak concentrations between tests 1 and 2, and tests 3 and 4 are very stark. On average the DIY air cleaner reduced the peak concentration of PM2.5 by 95%. Tests 1, 2, 3, and 4 were completed in the evenings of April 9, 16, 19, and 21, respectively. Figure 5 shows the PM2.5 concentrations and the Airthinx Air Quality (AQ) value over a two week period. The time when I started using the DIY air cleaner is marked with a black dashed line. AQ values range from 0 - 100, with 100 being the highest quality. This value is calculated internally, but we can see that the AQ drops whenever PM2.5 spikes.
Table 1: Peak results for each cooking event.
| Test | PM1 (μg/m3) | PM2.5 (μg/m3) | PM10 (μg/m3) |
| 1 | 107 | 194 | 279 |
| 2 | 61 | 96 | 109 |
| 3 | 4 | 5 | 6 |
| 4 | 4 | 9 | 10 |
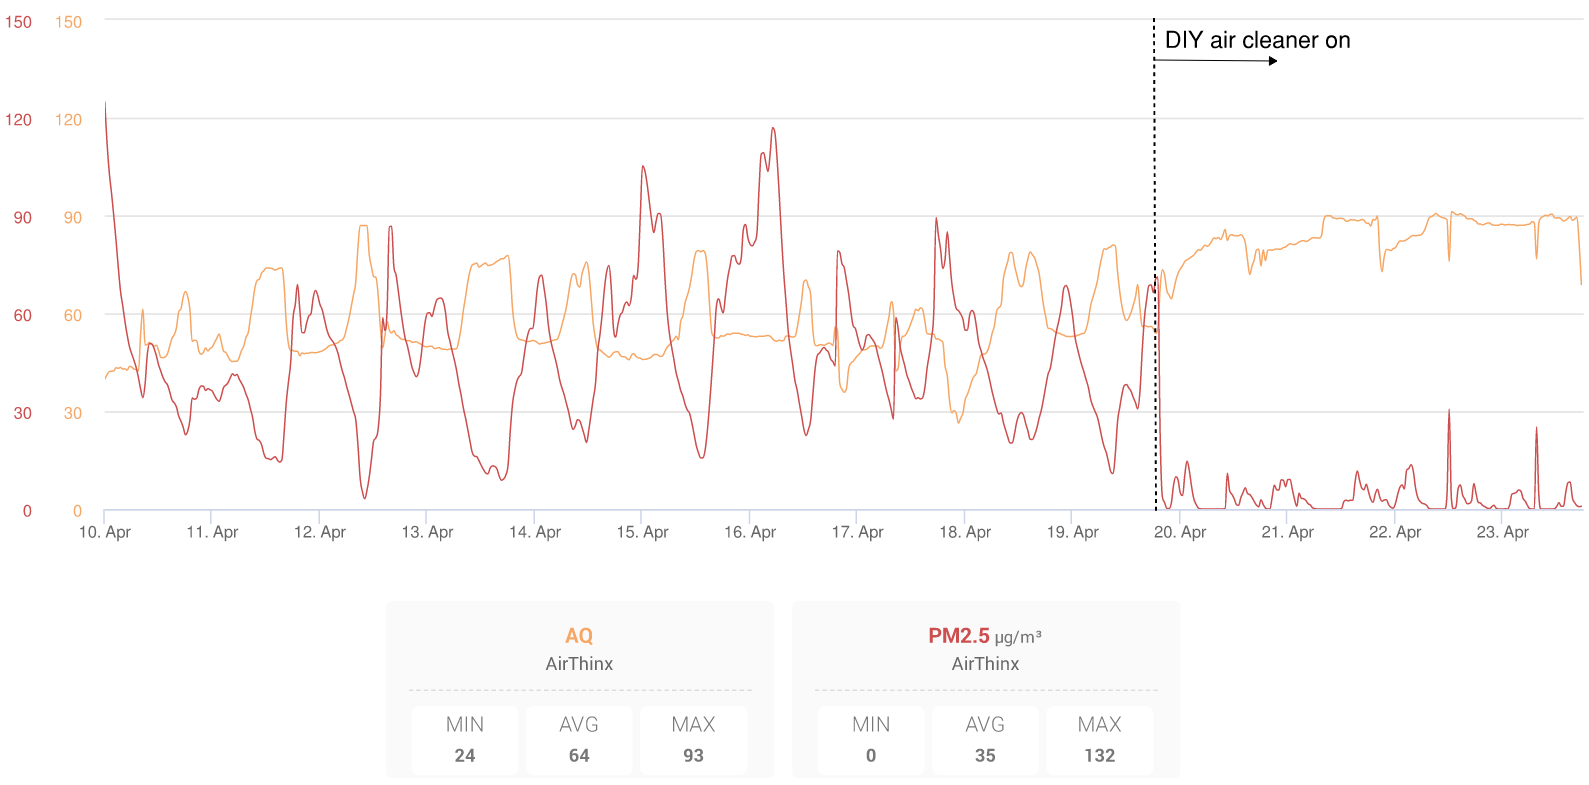
Figure 5: Graph from Airthinx monitoring website.
If we compare the PM2.5 data for a period of 5 days without the DIY air cleaner and with, this results in average PM2.5 concentrations of 52 μg/m3 and 5 μg/m3, respectively. This is approximately a 90% reduction in the average PM2.5 concentrations, which I think is very good for a simple and inexpensive home air cleaner. So as well as reducing the PM2.5 peaks the DIY air cleaner keeps the PM2.5 concentration low if run continuously.
The closest Colorado Department of Public Health and Environment (CDPHE) air quality monitoring site to my apartment is at the National Jewish Hospital, which is approximately 7 miles away. Outdoor concentrations of PM2.5 for the same times as the cooking tests ranged from 4 - 15 μg/m3. Because the outdoor concentrations are relatively low, we can assume that the indoor PM2.5 concentrations are mostly emitted inside my building.
By selecting specific times when the PM2.5 data is decreasing exponentially we can calculate the decay rate following each of the four cooking tests. PM2.5 has two mechanisms for decay, it can either be emitted through doors and windows or small cracks to the outside, or it can be deposited on surfaces through settling. Tests 1, 2, and 3 had decay rates of 0.16 per hour, 0.10 per hour, and 0.13 per hour, respectively. Test 4 did not have data showing a substantial peak of PM2.5 to be able to calculate the decay rate. Since there is no significant difference between the decay rates from tests 1, 2, and 3, we cannot conclude that the DIY air cleaner increases the decay rate of PM2.5 during peaks. But, of course, we can see that the overall maximum concentration is greatly decreased.
If we wanted to evaluate the air exchange rate (AER) of my apartment it would be best to evaluate the rate of decay on a pollutant that is not deposited on surfaces and therefore, only accounts for infiltration when all doors and windows are closed. If I use the CO2 concentrations during a period of time when I was sleeping and had my bedroom door closed I can see an exponential decrease in CO2 levels. Using this data I calculated a decay rate of 0.11 per hour. Since this value is not significantly different from the values calculated from the PM2.5 data it is difficult to determine my apartment’s infiltration rate. But if you would like to learn more about this topic, or read a research article related to this, Militello-Hourigan et al. 2018 is a great example.
Although these tests were not the most rigorous scientific experiment, I think we can still see that a DIY air cleaner can have significant impacts on indoor air quality. In-home portable air cleaners that are widely available typically cost in the hundreds of dollars. I used the Harvard-CU Boulder Portable Air Cleaner Calculator for Schools to explore the portable air cleaner options that would be recommended for a smaller space, such as my 520 square foot apartment. I found that I could buy an air cleaner for around $250 to $400.
Controlling indoor air quality can be more than using filters to clean the air. The three factors that go into IAQ include controlling the source of pollutants, diluting pollutants or removing them through ventilation, and cleaning the air by capturing or destroying pollutants in the re-circulated air. Therefore, if you have indoor air quality concerns and you have already made changes to remove sources and increase ventilation, then filtering the air in your home will be the next step to make improvements. And if you already have a box fan at home then purchasing filters and replacing them a couple of times per year may make sense for you. This is a DIY project that is simple and can make significant improvements in the quality of air indoors.
